This is a guide to photographing Bode’s Galaxy (M81 in the Messier catalogue) and its two neighbouring galaxies, the Cigar Galaxy and the Garland Galaxy, with a simple DSLR and lens. It is the third brightest galaxy after the Andromeda Galaxy and the Triangulum Galaxy. A DSLR can easily photograph it in dark conditions. For DSLR astrophotography, the Bode’s Galaxy is a prime deep-sky target along with the other bright objects.
About the Galaxy
Bode’s Galaxy, also known as Messier 81 (M81), is a spiral galaxy located in the constellation Ursa Major, approximately 12 million light-years away from Earth. It was discovered by Johann Elert Bode in 1774, which is why it carries his name. M81 is one of the largest and brightest galaxies in the M81 Group, a nearby group of galaxies that also includes the famous Cigar Galaxy (M82).
It is a popular object for astronomical study due to its well-defined spiral structure, active galactic nucleus, and relatively close proximity, making it an ideal target for both amateur and professional astronomers. Although not visible to the naked eye except under exceptional conditions, you can easily photograph it with a DSLR camera.
What’s the Messier Catalogue?
The Messier Catalogue is named after the French Astronomer Charles Messier. Being a comet hunter, he listed the non-comet objects in the night sky so that he would not mistake them for a comet. Thus, he created the Messier Catalogue, which consists of about a hundred deep sky objects is one of the most widely used catalogues for naming deep sky objects. The Bode’s Galaxy is Messier 81 (M81) in the list.
How to find the Galaxy in the sky?
As Bode’s Galaxy is not usually visible with the naked eye, locating it can be a little challenging. What’s easy to find is the constellation its located in- Ursa Major or the Big Dipper. The Big Dipper is an asterism: a shape formed in the sky by the bright stars.
The Big Dipper is a spoon shape formed by the stars of the Ursa Major constellation. To locate the galaxy in the constellation, you can use software such as Google Sky Maps or Stellarium. Using such apps, you can rely on the positions of the stars relative to each other to find the galaxy. Then, using the DSLR, you can hop from one star to the next in the viewfinder until you come to the target. Such a method is called “star hopping”. When you think you are near the object but can’t see it in the viewfinder, take a few test shots to locate it in the viewfinder and centre it.
How to photograph Bode’s Galaxy?
The Lens and the DSLR for Astrophotography
Here you see how I used a simple DSLR, lens and tripod setup to photograph Bode’s galaxy. All you need is any DSLR with the settings outlined below, a telephoto lens with a good zoom, and a tripod. The DSLR I used was a Canon EOS 2000D (Rebel T7 as it’s known in the US). The telephoto lens was also a Canon 75-300mm lens.
Settings of the DSLR Camera
- Manual Focus
- Maximum focal length
- RAW picture format
- ISO fixed to 3200 for the light frames
- Exposure: 1 second for the light frames
- Light Frames: 400
Taking Light Frames:-
Light frames are the actual images of the object you’ll later stack. To capture a sharp picture, start by adjusting your camera’s focus. Point it at a bright star—those in the Big Dipper work well—and fine-tune the focus until you see a crisp star in the live view. Once the star appears sharp, centre the galaxy on your screen.
Next, take a few test shots to locate the nebula in the frame. Once it’s positioned correctly, start capturing light frames. Take as many as possible. But first, double-check your settings. Keep the exposure time below 1.3 seconds to avoid star trails. Most importantly, shoot in RAW format—this is essential for proper stacking.
Taking the Calliberation Frames
Taking calibration frames is useful for removing aberrations and noise from your photos. These consist of two types: dark frames and flat frames. To take dark frames, cover the lens with its cap and take about 50 shots with the same settings. Flat frames are important for removing vignetting in the images. To take them, cover the lens with a white cloth. You need a uniform white light source behind the cloth, or you can take the frames in daylight. Switch the DSLR to Av mode and keep everything else the same, take around 50 of these.
Post-processing with GIMP
For post-processing, I rely on GIMP because it is both free and user-friendly. Mastering post-processing takes time and practice, but it is essential for creating stunning astrophotos. I have primarily learned this through trial and error while working on various stacked images. Don’t be discouraged by the process—it becomes more manageable with experience.
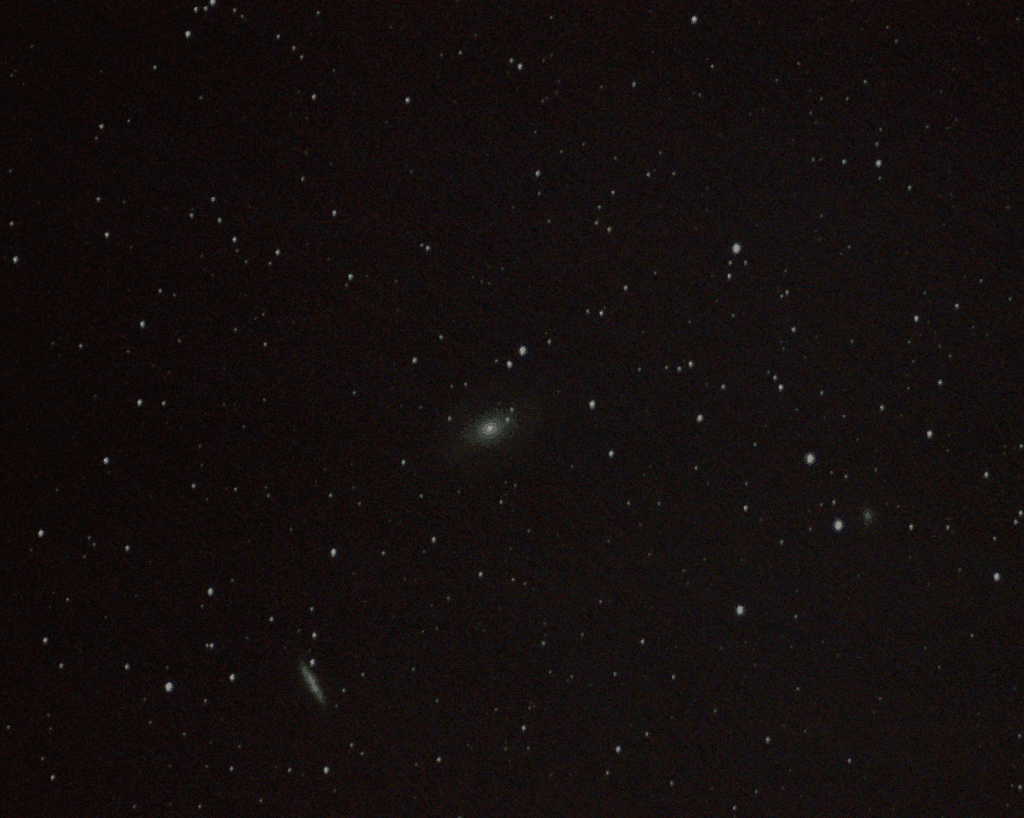
The Final Image of Bode’s Galaxy
Get the Equipment I used to Photograph Deep Sky Objects like Bode’s Galaxy!
Affiliate Disclosure: As an Amazon Associate, I earn from qualifying purchases. This helps support the blog at no extra cost to you.
Camera
I used the Canon 2000D. See on Amazon
Lens
75-300mm f/4-5.6. See on Amazon
To see what the best equipment is to start with photographing the night sky, check out these blogs: BEST DSLR CAMERAS FOR NIGHTSCAPE PHOTOGRAPHY, Best Tripods for DSLR Astrophotography: A Comprehensive Guide.