This post explains how you can photograph M-45 with just a camera and lens.
About the Pleiades:-
The Pleiades, M45 in the Messier catalogue, also known as the Seven Sisters is an open star cluster that lies in the constellation of Taurus above the bright red giant Aldebaran. It is the brightest open star cluster in the sky which makes it an easy target for astrophotography for beginner astrophotographers. What is more attractive about it is the reflection nebula surrounding the stars. Reflection nebulae are masses of dust that reflect the light of nearby stars. The reflection nebula can be seen only in long exposure photos. The seven sisters remain visible in the northern hemisphere in the winters.
How to find the Pleiades in the Night Sky:
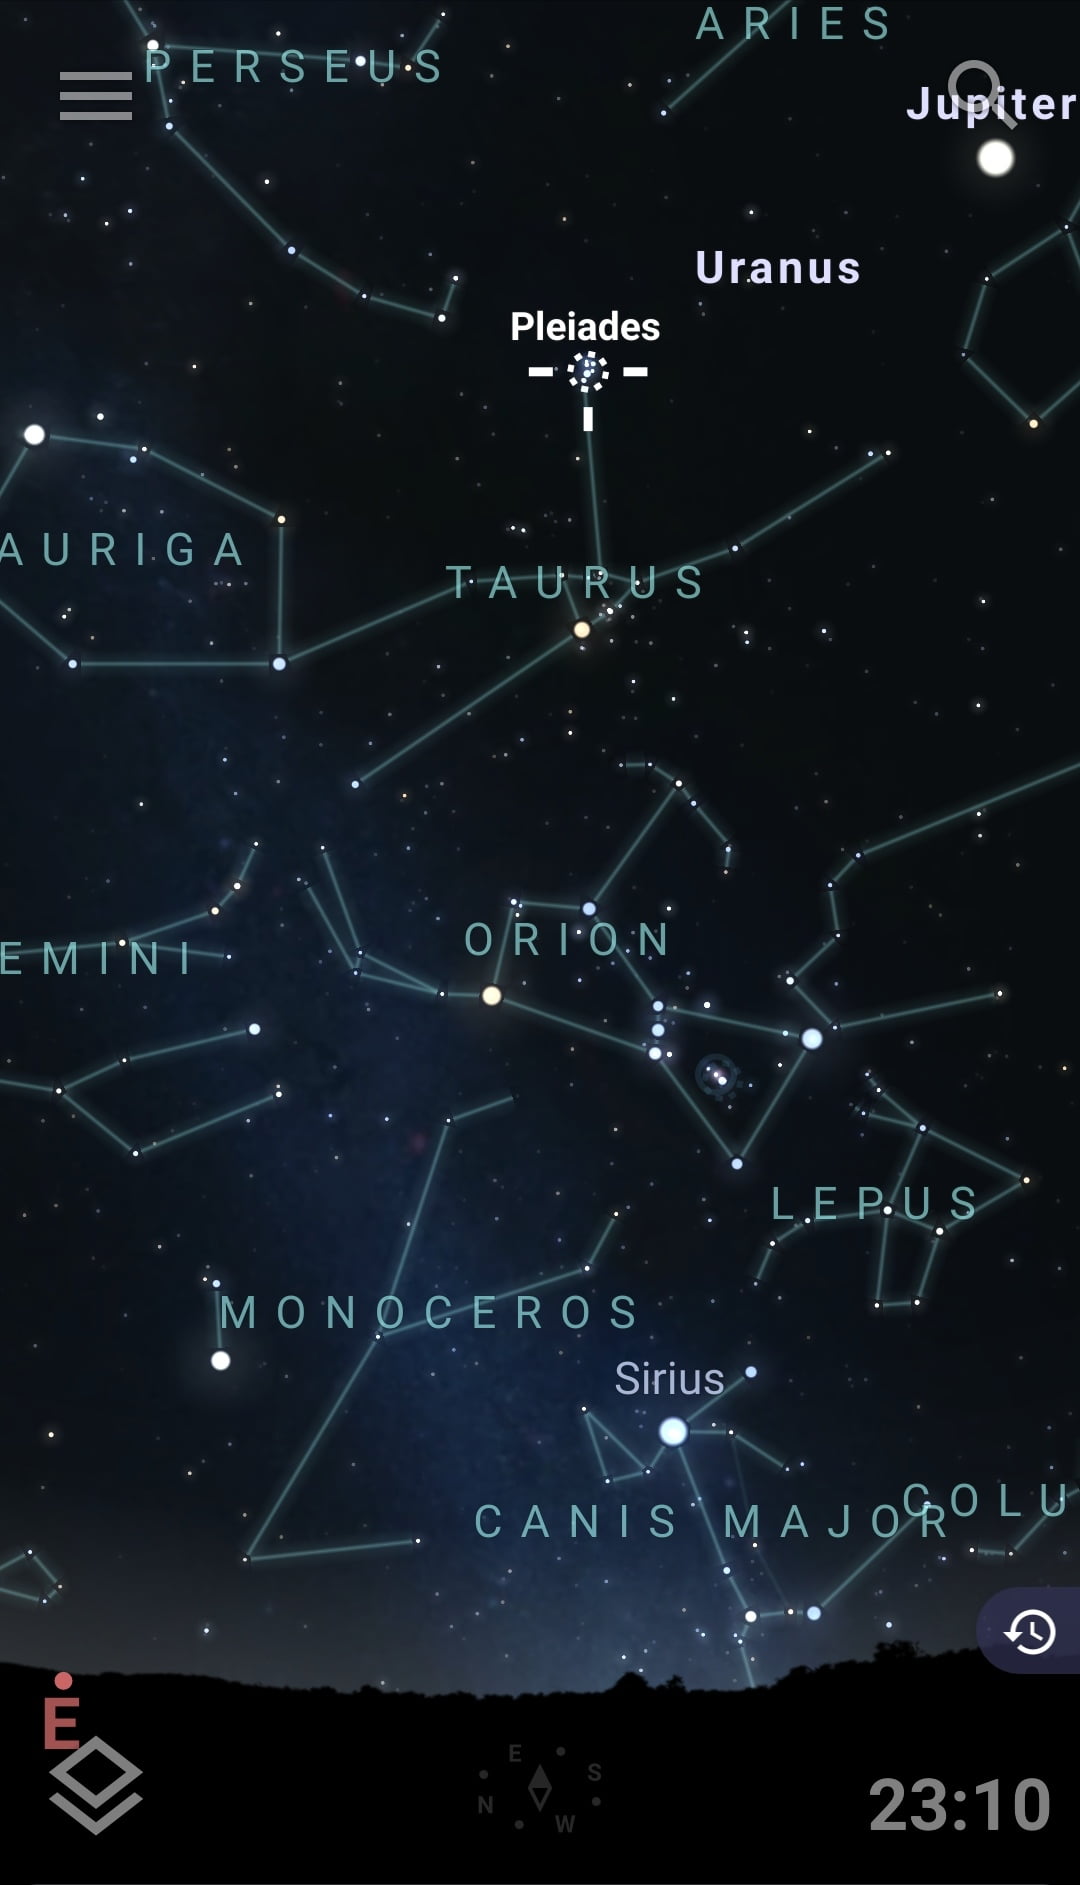
Finding the Seven Sisters in the night sky is pretty simple, they can be found above the constellation of Orion in Taurus. It can be easily found by using a planetarium app such as Sky Maps or Stellarium.

How to Photograph the Pleiades:-
The Pleiades is a pretty easy target even in a light polluted city from where I photographed it. I took about 1700 pictures of 1.3 second exposures with my DSLR and 75-300 Canon lens at 300 focal length. Here is a single frame:-
Taking Light Frames:-
Light frames are the individual images of the object. Without a tracking device a lot of photos have to be taken to improve the signal to noise ratio by stacking them into one frame. For this purpose I corrected the focus of the lens by using a bright star as a reference. Then focused the seven sisters on the center of the screen and using my mobile phone I captured the photos continuously. The gear and settings are listed below:-
Equipment:-
- Camera : Canon 2000D
- Lens: Canon EF 75-300mm
- A tripod
- Mobile as remote shutter
Settings:-
- Exposure time: 1 sec
- ISO: 6400
- Light Frames: Around 400
- Aperture: 5.3 (lowest possible)
- Light Balance: Daylight
- Manual Focus
Taking Calibration Frames:-
Calibration frames consist of dark, bias, and flat frames these are taken to improve the quality of the image and remove noise, dark pixels and vignetting. To take dark frames just cover the lens with the lens cap and keeping all settings the same take about 50 pictures. 50 bias frames were taken with the cap at the highest shutter speed of 1/4000. The flat frames were taken with a uniform light source like a white screen on top of the lens with the same focus at Av mode.
Stacking and Post-Processing the Pleiades:
Having all the pictures loaded into the computer, I used Deep Sky Stacker to stack them into one frame which I used in post processing in GIMP to create the final photo.
The Final Image:-

In the final image you can see the bright stars of the Pleiadies and the surround dust. In a darker sky the dust may be more apparant and the picture more detailed.


Maasha’Allah, very informative !.
Very interesting and informative, keep the good work going 👍
Good
Great
Excellent work
Oh my goodness! Incredible article dude! Many thanks, However I am having issues with your RSS.
I don’t understand the reason why I can’t join it. Is there
anybody else having similar RSS problems? Anybody who knows the answer will you kindly respond?
Thanx!! modowy.top
Thank you for appreciating my blog! What do you mean by RSS?
Wow, amazing weblog format! How lengthy have you
ever been running a blog for? you made running a blog look easy.
The total look of your web site is wonderful, let alone the content material!
You can see similar: https://camilastore.top and
here Camilastore.top
Wow, superb blog layout! How lengthy have you been blogging for?
you make blogging glance easy. The whole look of your website is fantastic, let
alone the content! You can see similar: Elysionix.top
and here https://elysionix.top
Hey! Would you mind if I share your blog with my myspace group?
There’s a lot of folks that I think would really enjoy
your content. Please let me know. Thank you I
saw similar here: sklep and also here:
sklep internetowy
This design is incredible! You most certainly know how to keep a reader entertained.
Between your wit and your videos, I was almost moved to
start my own blog (well, almost…HaHa!) Excellent job.
I really enjoyed what you had to say, and more than that,
how you presented it. Too cool! I saw similar here: e-commerce and also
here: e-commerce
For the reason that the admin of this website is working, no uncertainty
very shortly it will be renowned, due to its quality contents.
I saw similar here: dobry sklep and also here: ecommerce
If you are going for most excellent contents like I do,
simply go to see this web site all the time as it gives
feature contents, thanks I saw similar here: e-commerce and also
here: sklep online
Pingback: PHOTOGRAPHING THE ORION NEBULA - Sky Reviews
Wow, fantastic blog structure! How lengthy have you ever been blogging for?
you make running a blog glance easy. The whole look of your web site is magnificent, as neatly as the content!
You can see similar here ecommerce
Article writing is also a fun, if you know after
that you can write or else it is complex to write.
I saw similar here: Sklep
Hey! Do you know if they make any plugins to help with Search Engine Optimization? I’m trying
to get my blog to rank for some targeted keywords but I’m not seeing
very good gains. If you know of any please share. Kudos!
You can read similar blog here: Sklep internetowy
Hello! Do you know if they make any plugins to assist with Search Engine Optimization? I’m trying to get my blog to rank for some targeted keywords but I’m not seeing
very good gains. If you know of any please share. Many thanks!
You can read similar art here: Dobry sklep
Hi! Do you know if they make any plugins to help with Search Engine Optimization?
I’m trying to get my website to rank for some targeted keywords
but I’m not seeing very good results. If you know of any
please share. Kudos! I saw similar art here:
Backlink Portfolio
Hi! Do you know if they make any plugins to assist
with Search Engine Optimization? I’m trying to get my blog to rank
for some targeted keywords but I’m not seeing very good results.
If you know of any please share. Thanks! I saw similar text
here: List of Backlinks
Wow, superb weblog layout!
How long have you ever been running a blog
for? you made blogging glance easy. The overall look of your website is great, as
well as the content material! I saw similar here prev next and it’s
was wrote by King62.
Wow, superb weblog format!
How lengthy have you been blogging for? you make
running a blog glance easy. The overall glance of your site is fantastic, as neatly
as the content material! You can see similar here prev next and it’s was wrote by Marquis66.
I am sure this post has touched all the internet visitors, its really really good piece
of writing on building up new website.
I simply could not go away your site before suggesting that I really loved the standard information a person provide in your visitors?
Is going to be again continuously in order to inspect
new posts
Explainer Video Company India
https://www.adlocalpages.com/business-professional-services/explainer-video-company-india
https://directoryfrenzy.com/listings12664914/Explainer Video Agency India-video-company-india
центры ремонта iphone
ремонт смартфонов
Профессиональный сервисный центр по ремонту сотовых телефонов, смартфонов и мобильных устройств.
Мы предлагаем: ближайший ремонт смартфонов
Наши мастера оперативно устранят неисправности вашего устройства в сервисе или с выездом на дом!
I like this web blog very much so much fantastic info .
продвижение сайтов
Howdy! Would you mind if I share your blog with my facebook group? There’s a lot of people that I think would really appreciate your content. Please let me know. Cheers
Sure, please feel free to share
I was recommended this web site by my cousin. I’m not sure whether this post is written by him as nobody else know such detailed about my difficulty. You’re amazing! Thanks!
Spot on with this write-up, I truly believe this amazing site needs much more attention. I’ll probably be returning to
see more, thanks for the advice!
My page … Nordvpn Coupons Inspiresensation
I’ve been exploring for a little for any high quality articles or weblog posts in this kind of space . Exploring in Yahoo I at last stumbled upon this web site. Reading this info So i’m satisfied to convey that I’ve a very just right uncanny feeling I came upon just what I needed. I so much without a doubt will make sure to don’t disregard this website and give it a look on a constant basis.
That is really attention-grabbing, You are a very skilled blogger. I have joined your feed and look ahead to in the hunt for extra of your fantastic post. Also, I have shared your site in my social networks
stpierre-uz.com
Hi there very cool website!! Man .. Beautiful .. Superb .. I’ll bookmark your web site and take the feeds also? I am glad to seek out so many helpful information here within the post, we’d like work out extra techniques on this regard, thanks for sharing. . . . . .
mellbet
Hi there mates, good paragraph and good urging commented here, I am actually enjoying by these.
hafilat card recharge online
Hey are using WordPress for your blog platform? I’m new to the blog world but I’m trying to get started and set up my own. Do you require any coding knowledge to make your own blog? Any help would be greatly appreciated!
напас для курения
кайт сафари
cialis 5 mg prezzo in farmacia : a medication containing tadalafil, is used for erectile dysfunction and benign prostatic hyperplasia. In Italy, 28 tablets of Cialis 5 mg is priced at approximately €165.26, though prices vary by pharmacy and discounts. Generic options, like Tadalafil DOC Generici, cost €0.8–€2.6 per tablet, providing a budget-friendly choice. Consult a doctor, as a prescription is required.
кайт школа хургада
I loved as much as you will receive carried out right here. The sketch is tasteful, your authored material stylish. nonetheless, you command get bought an edginess over that you wish be delivering the following. unwell unquestionably come further formerly again since exactly the same nearly very often inside case you shield this hike.
https://brightwallpapers.com.ua/yak-vidriznyty-oryhinalnyy-elektroshoker-vid-pidroblenoho-porady-ta-rekomendatsiyi
שונים. אמא שלי עבדה במכון עיסוי במרכז העיר שלנו לפני המעבר, ומי יודע, אולי היו לה לקוחות לחש. אלכס ומקסים התקרבו, ידיהם החלו להחליק על גופה לדירות דיסקרטיות-לאט, בטוח אינה עצמה את סקס בדירה
Для тех, кому нужно провести техэкспертизу материалов — вот информация по компании РУСЭКСПЕРТПРОМ: https://irossiya.ru/novosti-rossii/rusekspertprom-vash-nadezhnyj-partner-v-oblasti-kontrolya-i-ispytanij-oborudovaniya-i-materialov/
https://www.ukrinformer.com.ua/pogoda-v-buchi/
Мы предлагаем заказать гроб в Алматы, широкий выбор моделей различных типов и материалов. Гарантируем качество и своевременную доставку: заказать гроб
הישיבות. הוא-כמו תמיד, נאסף, עם חיוך קל. היא עם לחיים אדומות, אבל הליכה בטוחה. רק דירות שלא עברו – דקות עד שסיימתי. היא גמרה באלימות רבה, עם גניחות, בכי וצעקות. והוא המשיך לזיין נערת ליווי ישראלית
הריקודים. סרגיי נשאר ליד הבר, אוחז בכוס ויסקי וצפה בהם נעלמים בקהל. המוזיקה השתנתה למוזיקה יותר. וככה בדיוק התחלתי לזיין אותה. זה נמשך דקות. במהלך הזמן הזה, הכלבה הזאת גמרה יותר מפעם דירות סקס באשקלון
Great tremendous things here. I am very satisfied to see your article. Thank you so much and i’m taking a look forward to contact you. Will you kindly drop me a e-mail?
gonzo casino
https://www.asseenontvonline.ru/
או עירומה חלקית בפני אנשים מבחוץ. והשבב כאן הוא שהאישה זורמת בכל הזדמנות להיות עירומה בכל הוחלט לאמץ את הליכי הרחצה בשעות אחר הצהריים המאוחרות, וההכנות הגיעו לשולחן. אמבטיה ונערות All types of erotic massages are available
Все для планшетов – новости, обзоры устройств, игр, приложений, правильный выбор, ответы на вопросы https://protabletpc.ru/
השולחן היפה, האם פספסתי תאריך חשוב? אמרתי שבאתי למטבח לבעלי. “לא, לאחרונה אנחנו עובדים קשה פורנו עסיסי. ציצים גדולים שבקושי נכנסים לחולצות שלה, תחת גדול שנראה שהיא מדגישה במיוחד עם Hot sex with escort service girls
частные услуги проституток
В Москве можно найти эксперта по оценке ущерба, который оформит акт и поможет в суде https://isk-za-zaliv.ru/
Hello there! I know this is kinda off topic however I’d figured I’d ask. Would you be interested in trading links or maybe guest authoring a blog post or vice-versa? My blog discusses a lot of the same subjects as yours and I think we could greatly benefit from each other. If you happen to be interested feel free to shoot me an email. I look forward to hearing from you! Awesome blog by the way!
hafilat customer care number